Bean创建过程
Bean的创建过程是从beanFactory的getBean方法开始的。以单例bean为例,当从单例池中获取不到bean时,会调用createBean进行创建。
先看AbstractBeanFactory.doGetBean()中的其中一段代码:
// Create bean instance.
if (mbd.isSingleton()) {
   sharedInstance = getSingleton(beanName, () -> {
      try {
         return createBean(beanName, mbd, args);
      }
      catch (BeansException ex) {
         // Explicitly remove instance from singleton cache: It might have been put there
         // eagerly by the creation process, to allow for circular reference resolution.
         // Also remove any beans that received a temporary reference to the bean.
         destroySingleton(beanName);
         throw ex;
      }
   });
   bean = getObjectForBeanInstance(sharedInstance, name, beanName, mbd);
}这个方法中调用了getSingleton,第二个参数是一个lambda表达式。
在getSingleton方法中:
- 会先尝试从单例池中找bean,找到则直接返回。
- 找不到先调用
beforeSingletonCreation() - 然后调用上面的lambda表达式进行创建bean
- 接着调用
afterSingletonCreation() - 最后
addSingleton()将bean添加到单例池中
代码如下:
public Object getSingleton(String beanName, ObjectFactory<?> singletonFactory) {
   Assert.notNull(beanName, "Bean name must not be null");
   synchronized (this.singletonObjects) {
       // 从单例池中找
      Object singletonObject = this.singletonObjects.get(beanName);
      if (singletonObject == null) {
         if (this.singletonsCurrentlyInDestruction) {
            throw new BeanCreationNotAllowedException(beanName,
                  "Singleton bean creation not allowed while singletons of this factory are in destruction " +
                  "(Do not request a bean from a BeanFactory in a destroy method implementation!)");
         }
         if (logger.isDebugEnabled()) {
            logger.debug("Creating shared instance of singleton bean '" + beanName + "'");
         }
         // 准备开始创建bean,将beanName存到singletonsCurrentlyInCreation集合中,标记该bean正在创建
         beforeSingletonCreation(beanName);
         boolean newSingleton = false;
         boolean recordSuppressedExceptions = (this.suppressedExceptions == null);
         if (recordSuppressedExceptions) {
            this.suppressedExceptions = new LinkedHashSet<>();
         }
         try {
            // 调用lambda表达式,实际是调用了createBean
            singletonObject = singletonFactory.getObject();
            newSingleton = true;
         }
         // 此处省略了部分catch异常的代码
         finally {
            if (recordSuppressedExceptions) {
               this.suppressedExceptions = null;
            }
            // 创建bean结束,将其从singletonsCurrentlyInCreation集合中移除
            afterSingletonCreation(beanName);
         }
         if (newSingleton) {
            // 将bean添加到单例池
            addSingleton(beanName, singletonObject);
         }
      }
      return singletonObject;
   }
}所以,真正创建bean的过程还得看createBean()方法,createBean()中又调用了doCreateBean(),这个方法比较长,摘出重要的部分如下:
protected Object doCreateBean(String beanName, RootBeanDefinition mbd, @Nullable Object[] args)
      throws BeanCreationException {

   // Instantiate the bean.
   BeanWrapper instanceWrapper = null;
   if (mbd.isSingleton()) {
      instanceWrapper = this.factoryBeanInstanceCache.remove(beanName);
   }
   // 实例化bean,通过反射new
   if (instanceWrapper == null) {
      instanceWrapper = createBeanInstance(beanName, mbd, args);
   }
   Object bean = instanceWrapper.getWrappedInstance();
   Class<?> beanType = instanceWrapper.getWrappedClass();
   if (beanType != NullBean.class) {
      mbd.resolvedTargetType = beanType;
   }

   // Allow post-processors to modify the merged bean definition.
   synchronized (mbd.postProcessingLock) {
      if (!mbd.postProcessed) {
         try {
            applyMergedBeanDefinitionPostProcessors(mbd, beanType, beanName);
         }
         catch (Throwable ex) {
            throw new BeanCreationException(mbd.getResourceDescription(), beanName,
                  "Post-processing of merged bean definition failed", ex);
         }
         mbd.postProcessed = true;
      }
   }

   // Eagerly cache singletons to be able to resolve circular references
   // even when triggered by lifecycle interfaces like BeanFactoryAware.
   // 解决循环依赖,提前暴露单例对象
   boolean earlySingletonExposure = (mbd.isSingleton() && this.allowCircularReferences &&
         isSingletonCurrentlyInCreation(beanName));
   if (earlySingletonExposure) {
      if (logger.isTraceEnabled()) {
         logger.trace("Eagerly caching bean '" + beanName +
               "' to allow for resolving potential circular references");
      }
      // 将lambda表达式添加到三级缓存中
      addSingletonFactory(beanName, () -> getEarlyBeanReference(beanName, mbd, bean));
   }

   // Initialize the bean instance.
   Object exposedObject = bean;
   try {
      // 属性填充
      populateBean(beanName, mbd, instanceWrapper);
      // 初始化,执行Aware,执行beanPostProcessor
      exposedObject = initializeBean(beanName, exposedObject, mbd);
   }
   // 省略catch代码块

   if (earlySingletonExposure) {
      Object earlySingletonReference = getSingleton(beanName, false);
       if (earlySingletonReference != null) {
           if (exposedObject == bean) {
               exposedObject = earlySingletonReference;
           }
           // 省略
       }

   }

   // Register bean as disposable.
   // 省略

   return exposedObject;
}
从上面代码中,可以看到创建bean的大致过程:
- 实例化bean:createBeanInstance
- 属性填充:populateBean
- 初始化bean:initializeBean,包含执行Aware,执行beanPostProcessor
下面看看这三个步骤的细节
createBeanInstance
其实即使不看createBeanInstance的代码,也大致能猜到,无非就是通过反射的机制来实例化对象,不过实际上要更复杂一下,别忘了构造函数的依赖注入,就是在这里实现的。
我们可以先看下这个方法的注释:

该方法中,其实就是使用这四种方式实例化对象的:
protected BeanWrapper createBeanInstance(String beanName, RootBeanDefinition mbd, @Nullable Object[] args) {
   // Make sure bean class is actually resolved at this point.
   Class<?> beanClass = resolveBeanClass(mbd, beanName);

   if (beanClass != null && !Modifier.isPublic(beanClass.getModifiers()) && !mbd.isNonPublicAccessAllowed()) {
      throw new BeanCreationException(mbd.getResourceDescription(), beanName,
            "Bean class isn't public, and non-public access not allowed: " + beanClass.getName());
   }

   Supplier<?> instanceSupplier = mbd.getInstanceSupplier();
   if (instanceSupplier != null) {
      // 实例化方式一
      return obtainFromSupplier(instanceSupplier, beanName);
   }

   if (mbd.getFactoryMethodName() != null) {
      // 实例化方式二
      return instantiateUsingFactoryMethod(beanName, mbd, args);
   }

   // Shortcut when re-creating the same bean...
   boolean resolved = false;
   boolean autowireNecessary = false;
   if (args == null) {
      synchronized (mbd.constructorArgumentLock) {
         if (mbd.resolvedConstructorOrFactoryMethod != null) {
            resolved = true;
            autowireNecessary = mbd.constructorArgumentsResolved;
         }
      }
   }
   if (resolved) {
      if (autowireNecessary) {
         // 实例化方式三
         return autowireConstructor(beanName, mbd, null, null);
      }
      else {
         // 实例化方式四
         return instantiateBean(beanName, mbd);
      }
   }

   // Candidate constructors for autowiring?
   Constructor<?>[] ctors = determineConstructorsFromBeanPostProcessors(beanClass, beanName);
   if (ctors != null || mbd.getResolvedAutowireMode() == AUTOWIRE_CONSTRUCTOR ||
         mbd.hasConstructorArgumentValues() || !ObjectUtils.isEmpty(args)) {
      return autowireConstructor(beanName, mbd, ctors, args);
   }

   // Preferred constructors for default construction?
   ctors = mbd.getPreferredConstructors();
   if (ctors != null) {
      return autowireConstructor(beanName, mbd, ctors, null);
   }

   // No special handling: simply use no-arg constructor.
   return instantiateBean(beanName, mbd);
}
obtainFromSupplier
这种方法,是直接调用Supplier接口的get()方法拿到实例化好的对象,也就是说具体如何实例化不归当前方法管
instantiateUsingFactoryMethod
如果开发者实现了FactoryBean接口,则使用该方式进行实例化对象。FactoryBean接口是让开发者定制实例化过程的接口
autowireConstructor
从命名就可以看出,当需要自动注入的时候,就会调用这种方式进行实例化
instantiateBean
使用默认构造函数实例化
populateBean
属性填充就是在实例化之后,为bean的属性注入值。
例如UserService中有个属性OrderService orderService,且该属性使用了@Autowire注解,那么在属性填充时,就会去获取orderService这个bean
如果OrderService这个bean中刚好也依赖了UserService,那么就形成了死循环,这就是面试常问的循环依赖。
至于如何解决循环依赖问题,这里先不展开,请往后看。
现在先看看populateBean源码:
protected void populateBean(String beanName, RootBeanDefinition mbd, @Nullable BeanWrapper bw) {
   if (bw == null) {
      if (mbd.hasPropertyValues()) {
         throw new BeanCreationException(
               mbd.getResourceDescription(), beanName, "Cannot apply property values to null instance");
      }
      else {
         // Skip property population phase for null instance.
         return;
      }
   }

   // Give any InstantiationAwareBeanPostProcessors the opportunity to modify the
   // state of the bean before properties are set. This can be used, for example,
   // to support styles of field injection.
   // 执行InstantiationAwareBeanPostProcessor的postProcessAfterInstantiation
   if (!mbd.isSynthetic() && hasInstantiationAwareBeanPostProcessors()) {
      for (BeanPostProcessor bp : getBeanPostProcessors()) {
         if (bp instanceof InstantiationAwareBeanPostProcessor) {
            InstantiationAwareBeanPostProcessor ibp = (InstantiationAwareBeanPostProcessor) bp;
            if (!ibp.postProcessAfterInstantiation(bw.getWrappedInstance(), beanName)) {
               return;
            }
         }
      }
   }

   PropertyValues pvs = (mbd.hasPropertyValues() ? mbd.getPropertyValues() : null);

   int resolvedAutowireMode = mbd.getResolvedAutowireMode();
   if (resolvedAutowireMode == AUTOWIRE_BY_NAME || resolvedAutowireMode == AUTOWIRE_BY_TYPE) {
      MutablePropertyValues newPvs = new MutablePropertyValues(pvs);
      // Add property values based on autowire by name if applicable.
      // 根据名称自动注入
      if (resolvedAutowireMode == AUTOWIRE_BY_NAME) {
         autowireByName(beanName, mbd, bw, newPvs);
      }
      // Add property values based on autowire by type if applicable.
      // 根据类型自动注入
      if (resolvedAutowireMode == AUTOWIRE_BY_TYPE) {
         autowireByType(beanName, mbd, bw, newPvs);
      }
      pvs = newPvs;
   }

   boolean hasInstAwareBpps = hasInstantiationAwareBeanPostProcessors();
   boolean needsDepCheck = (mbd.getDependencyCheck() != AbstractBeanDefinition.DEPENDENCY_CHECK_NONE);

   PropertyDescriptor[] filteredPds = null;
   if (hasInstAwareBpps) {
      if (pvs == null) {
         pvs = mbd.getPropertyValues();
      }
      // 执行InstantiationAwareBeanPostProcessor的postProcessPropertyValues
      for (BeanPostProcessor bp : getBeanPostProcessors()) {
         if (bp instanceof InstantiationAwareBeanPostProcessor) {
            InstantiationAwareBeanPostProcessor ibp = (InstantiationAwareBeanPostProcessor) bp;
            PropertyValues pvsToUse = ibp.postProcessProperties(pvs, bw.getWrappedInstance(), beanName);
            if (pvsToUse == null) {
               if (filteredPds == null) {
                  filteredPds = filterPropertyDescriptorsForDependencyCheck(bw, mbd.allowCaching);
               }
               pvsToUse = ibp.postProcessPropertyValues(pvs, filteredPds, bw.getWrappedInstance(), beanName);
               if (pvsToUse == null) {
                  return;
               }
            }
            pvs = pvsToUse;
         }
      }
   }
   if (needsDepCheck) {
      if (filteredPds == null) {
         filteredPds = filterPropertyDescriptorsForDependencyCheck(bw, mbd.allowCaching);
      }
      checkDependencies(beanName, mbd, filteredPds, pvs);
   }
   if (pvs != null) {
      applyPropertyValues(beanName, mbd, bw, pvs);
   }
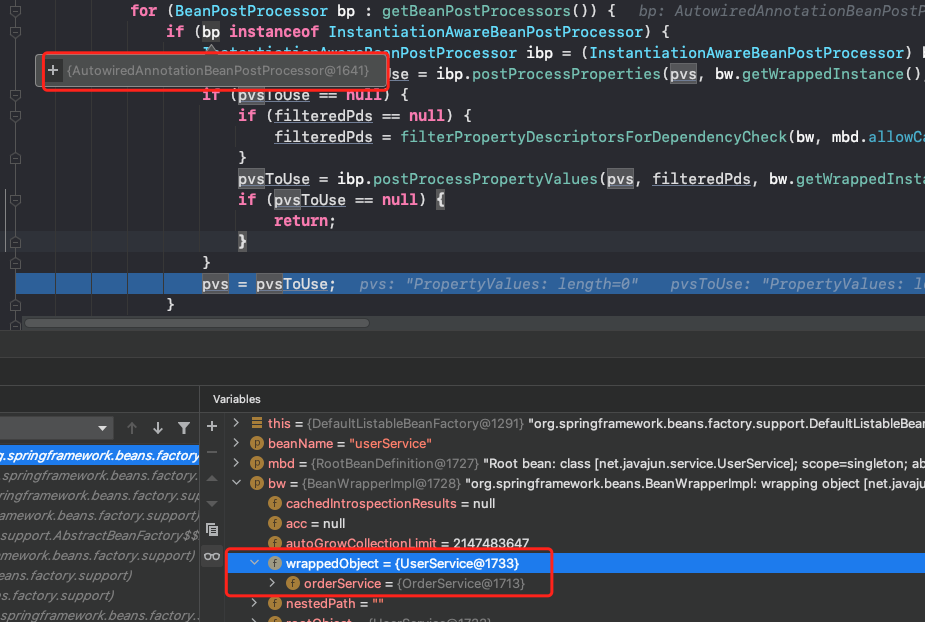
}可以看到,populateBean中调用了InstantiationAwareBeanPostProcessor后置处理器,通过debug发现,是AutowiredAnnotationBeanPostProcessor这个后置处理器为UserService填充了OrderService这个属性:

继续跟踪,最终找到设置属性的代码:
protected void inject(Object bean, @Nullable String beanName, @Nullable PropertyValues pvs) throws Throwable {
   Field field = (Field) this.member;
   Object value;
   if (this.cached) {
      try {
         value = resolvedCachedArgument(beanName, this.cachedFieldValue);
      }
      catch (NoSuchBeanDefinitionException ex) {
         // Unexpected removal of target bean for cached argument -> re-resolve
         value = resolveFieldValue(field, bean, beanName);
      }
   }
   else {
      value = resolveFieldValue(field, bean, beanName);
   }
   if (value != null) {
      ReflectionUtils.makeAccessible(field);
      // 设置属性值
      field.set(bean, value);
   }
}
initializeBean
该方法结构很简单:
protected Object initializeBean(String beanName, Object bean, @Nullable RootBeanDefinition mbd) {
   // 执行aware扩展点
   if (System.getSecurityManager() != null) {
      AccessController.doPrivileged((PrivilegedAction<Object>) () -> {
         invokeAwareMethods(beanName, bean);
         return null;
      }, getAccessControlContext());
   }
   else {
      invokeAwareMethods(beanName, bean);
   }
   // 执行postProcess Before
   // @PostConstruct就是在这里实现的
   Object wrappedBean = bean;
   if (mbd == null || !mbd.isSynthetic()) {
      wrappedBean = applyBeanPostProcessorsBeforeInitialization(wrappedBean, beanName);
   }

   try {
      // 执行init方法
      invokeInitMethods(beanName, wrappedBean, mbd);
   }
   catch (Throwable ex) {
      throw new BeanCreationException(
            (mbd != null ? mbd.getResourceDescription() : null),
            beanName, "Invocation of init method failed", ex);
   }
   // 执行BeanPostProcessors after
   if (mbd == null || !mbd.isSynthetic()) {
      wrappedBean = applyBeanPostProcessorsAfterInitialization(wrappedBean, beanName);
   }

   return wrappedBean;
}
循环依赖
循环依赖就是A依赖B,B又依赖A。
先抛开Spring来谈,两个普通的Java对象,如何解决循环依赖?
很简单,假设有UserService和OrderService:
public class UserService {

   private OrderService orderService;

   public OrderService getOrderService() {
      return orderService;
   }

   public void setOrderService(OrderService orderService) {
      this.orderService = orderService;
   }
}

public class OrderService {

	private UserService userService;

	public UserService getUserService() {
		return userService;
	}

	public void setUserService(UserService userService) {
		this.userService = userService;
	}
}
循环依赖:
UserService userService = new UserService();
OrderService orderService = new OrderService();

userService.setOrderService(orderService);
orderService.setUserService(userService);
是不是很简单?其实Spring解决循环依赖也是这个流程,只不过Spring Bean不是一个普通的Java对象,它需要经过属性填充,初始化,各种后置处理器处理等生命周期后,才能称之为bean。
因此为了解决循环依赖问题,Spring有一级缓存,二级缓存,三级缓存。
/** Cache of singleton objects: bean name to bean instance. */
// 一级缓存
private final Map<String, Object> singletonObjects = new ConcurrentHashMap<>(256);

/** Cache of singleton factories: bean name to ObjectFactory. */
// 三级缓存
private final Map<String, ObjectFactory<?>> singletonFactories = new HashMap<>(16);

/** Cache of early singleton objects: bean name to bean instance. */
// 二级缓存
private final Map<String, Object> earlySingletonObjects = new ConcurrentHashMap<>(16);- 一级缓存其实就是单例池
- 二级缓存可以认为是一个半成品bean,也叫提前暴露的单例bean
- 三级缓存是一个存放ObjectFactory接口的集合
当我们从单例池中寻找bean时,会先查一级缓存,再查二级缓存,最后找三级缓存:
protected Object getSingleton(String beanName, boolean allowEarlyReference) {
   // Quick check for existing instance without full singleton lock
   // 从一级缓存中取
   Object singletonObject = this.singletonObjects.get(beanName);
   // 如果bean正在创建中
   if (singletonObject == null && isSingletonCurrentlyInCreation(beanName)) {
      // 从二级缓存中取
      singletonObject = this.earlySingletonObjects.get(beanName);
      if (singletonObject == null && allowEarlyReference) {
         synchronized (this.singletonObjects) {
            // Consistent creation of early reference within full singleton lock
            singletonObject = this.singletonObjects.get(beanName);
            if (singletonObject == null) {
               singletonObject = this.earlySingletonObjects.get(beanName);
               // 二级缓存中没有,则从三级缓存中取出lambda
               if (singletonObject == null) {
                  ObjectFactory<?> singletonFactory = this.singletonFactories.get(beanName);
                  if (singletonFactory != null) {
                     // 调用lambda,得到bean,并放入二级缓存
                     singletonObject = singletonFactory.getObject();
                     this.earlySingletonObjects.put(beanName, singletonObject);
                     this.singletonFactories.remove(beanName);
                  }
               }
            }
         }
      }
   }
   return singletonObject;
}这里有一点很重要的:二级缓存中的bean,是调用三级缓存的ObjectFactory.getObject()得到的并放入二级缓存的
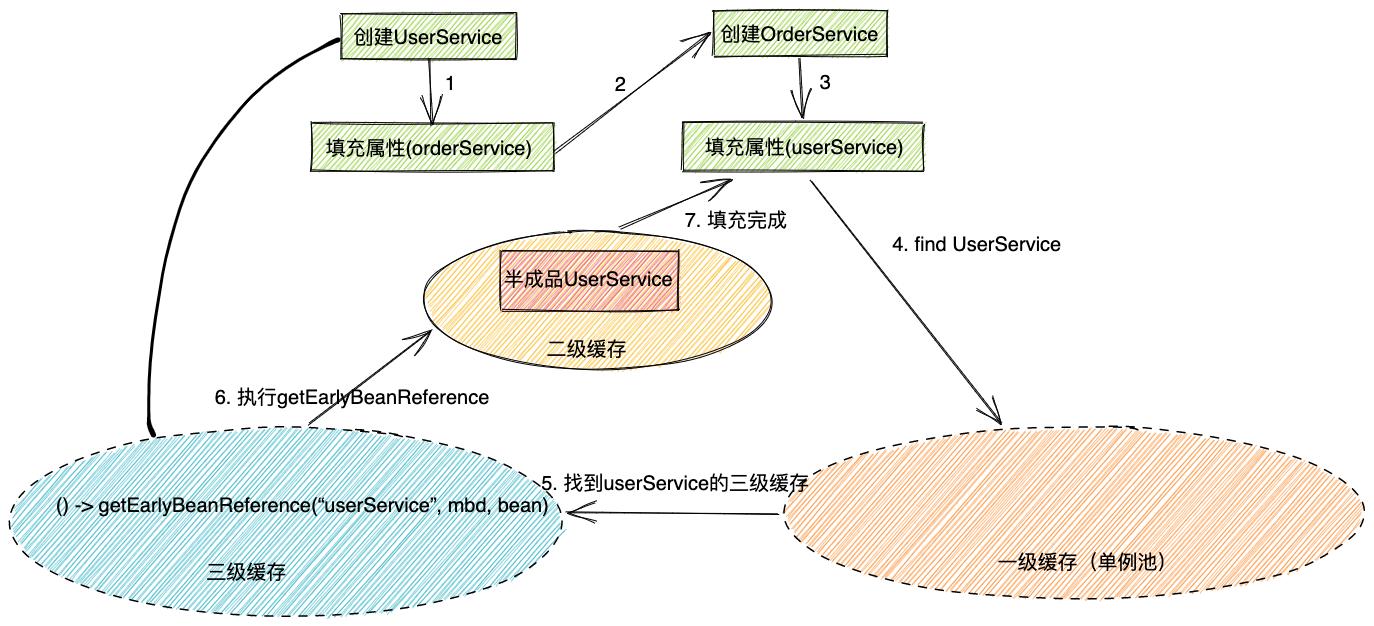
解决循环依赖过程:
- 创建UserService bean
- 把lambda表达式添加到三级缓存:
() -> getEarlyBeanReference(beanName, mbd, bean) - 给UserService 填充属性,发现依赖OrderService
- 开始创建OrderService bean
- 给OrderService 填充属性,发现依赖UserService
- 寻找UserService bean,发现UserService正在创建中,且有三级缓存,于是调用三级缓存,得到半成品UserService bean,并放入二级缓存
orderService.setUserService(半成品bean)- OrderService Bean创建完成,放入一级缓存(单例池)
userService.setOrderService(orderService)- UserService 创建完成,放入一级缓存(单例池)
示意图大致如下,请按箭头序号看

循环依赖过程其实并不复杂,关键在于为什么需要三级缓存。这也是面试常问的问题。
想知道为什么需要三级缓存,我们就需要看看三级缓存中的lambda表达式到底做了什么。
protected Object getEarlyBeanReference(String beanName, RootBeanDefinition mbd, Object bean) {
   Object exposedObject = bean;
   if (!mbd.isSynthetic() && hasInstantiationAwareBeanPostProcessors()) {
      for (BeanPostProcessor bp : getBeanPostProcessors()) {
         if (bp instanceof SmartInstantiationAwareBeanPostProcessor) {
            SmartInstantiationAwareBeanPostProcessor ibp = (SmartInstantiationAwareBeanPostProcessor) bp;
            exposedObject = ibp.getEarlyBeanReference(exposedObject, beanName);
         }
      }
   }
   return exposedObject;
}从源码中看到,这个方法中执行了一个BeanPostProcessor后置处理器,其中一个实现居然是AbstractAutoProxyCreator,如下图:

这个类看着眼熟吗?其实这就是AOP。
当循环依赖发生时,调用三级缓存中的lambda表达式,得到一个半成品bean,活着叫提前暴露的bean,并放入二级缓存。
如果需要AOP,则这个半成品就是AOP代理对象。
我们知道AOP基本大致原理是给原来的对象创建一个代理对象,通过代理对象调用目标方法才能达到切面的目的。
因此三级缓存就是为了创建AOP代理对象(如果有使用AOP)。
二级缓存用来临时存放三级缓存产生的对象。

